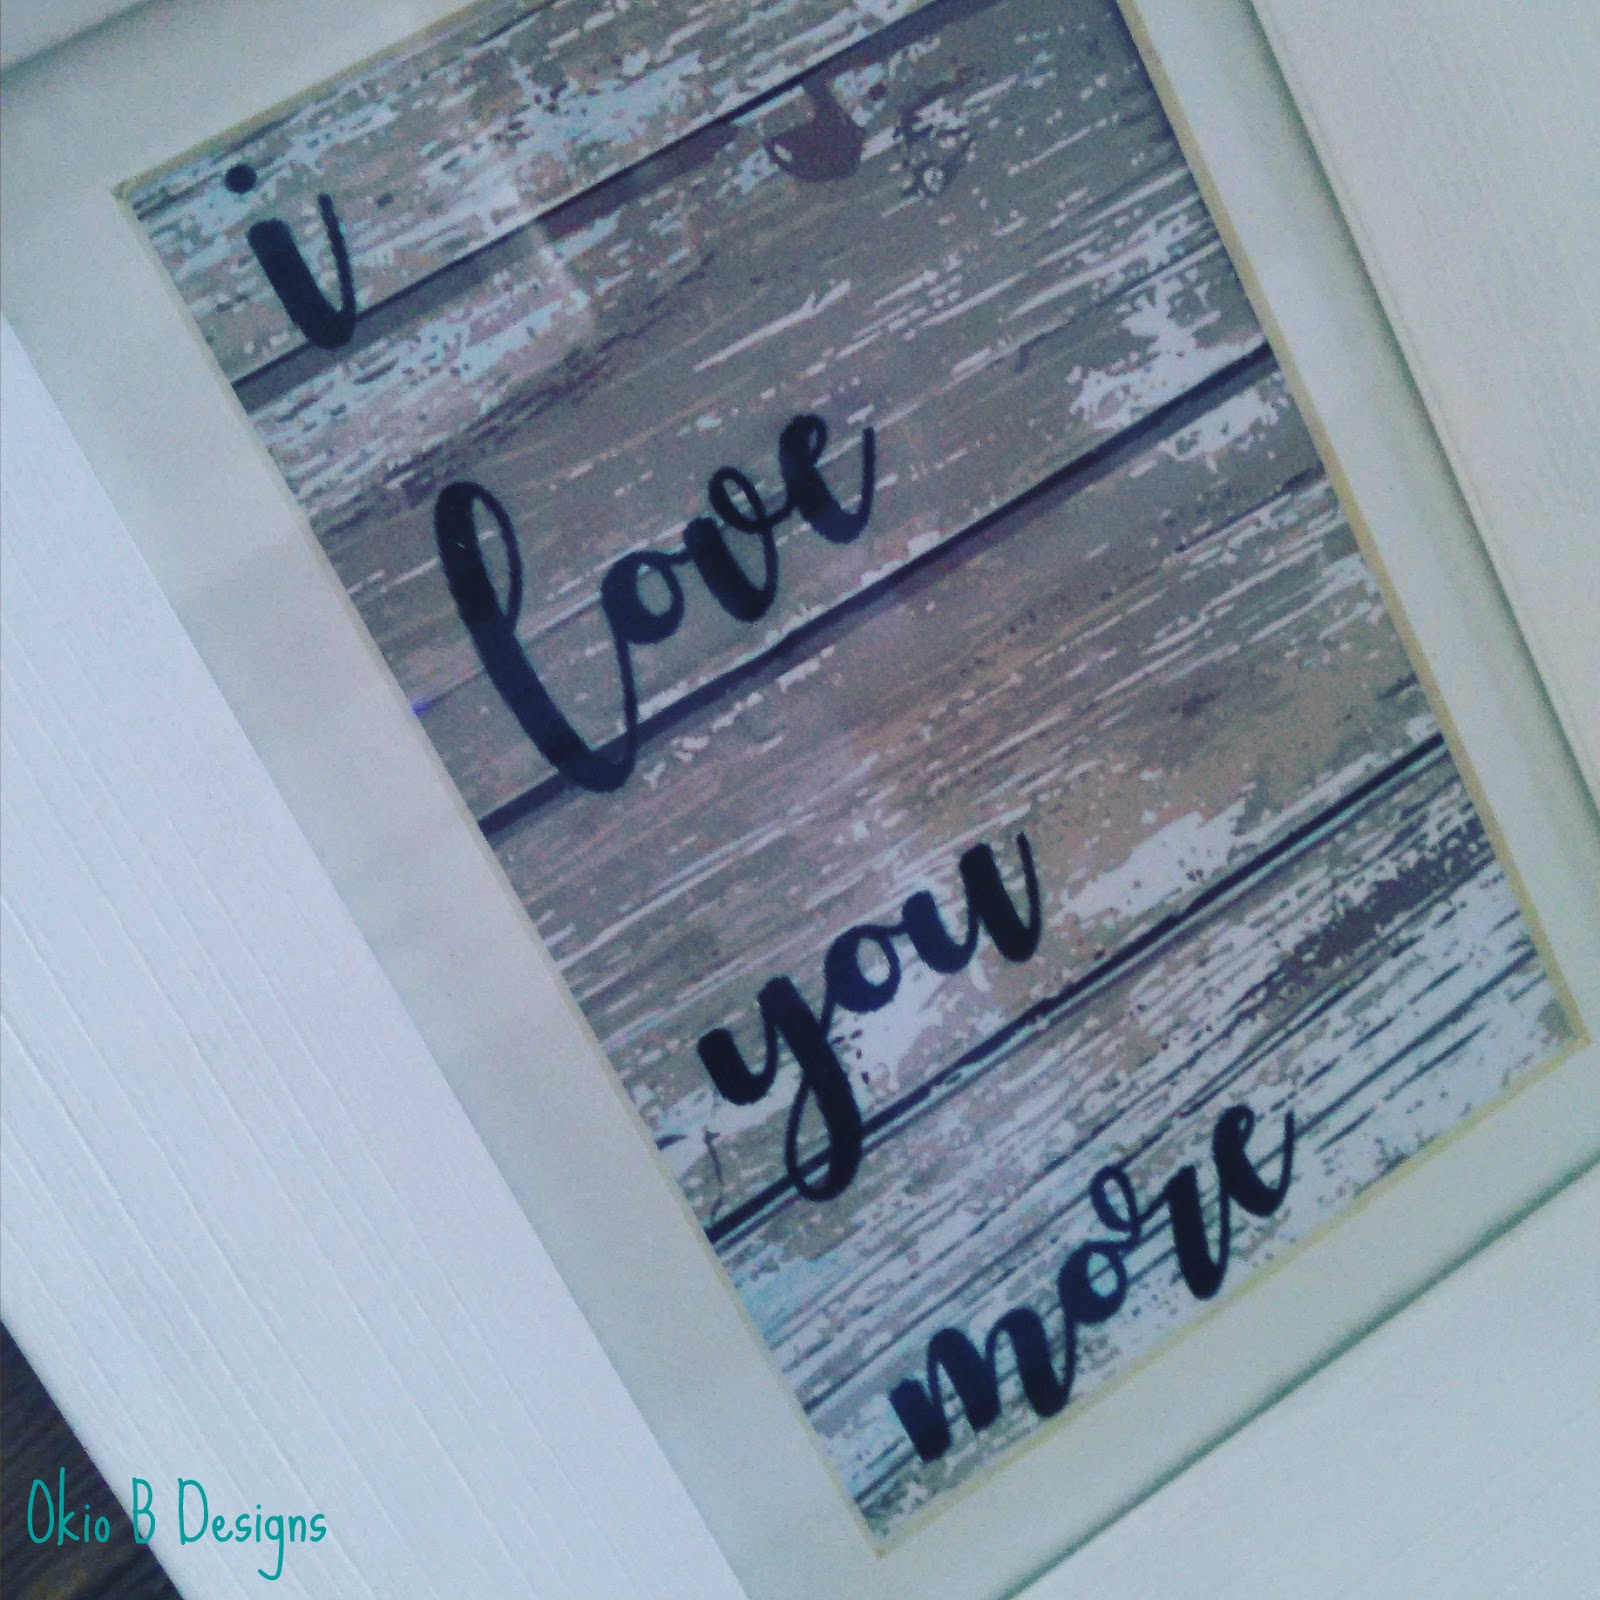
It's probably no surprise that I've already started working on some Valentine's Day projects. Today I'm sharing some sweet framed prints that were super easy and relatively free to make. To start, I jumped over to Pinterest and started searching up shiplap backgrounds.
After scrolling through what seemed like 100 shiplap wall paper pins, I finally found a pretty background that perfectly captured what I was looking for. After downloading it to my computer, I headed over to DaFont to find some faux calligraphy fonts that I could use for my prints. My favorite is called Autumn in November. It's what I used on this "i love you more" print above.
Then I found this great old typewriter font that was just screaming out to be used too. It's called Lucky Typewriter. Now if you're not familiar with DaFont, you simply search up the type of font you are looking for and then download it safely to your computer. Yes, you have to go through the whole extract all files hub-bub, but believe me, it's worth it!
Once you've downloaded your font, simply print out your shiplap background onto plain white paper (or cardstock). Then open a Word document and line up your words for how you want them to look on the shiplap paper. Feed the shiplap paper (that you already printed) through your printer and simply print the Word document onto it. Super easy, right?! Total cost $0 - unless you're like me and you had to head to Target to buy a new 8x10 frame to put one in. So this cost me $6.99 total. Jeanine
Merry Christmas to my bloggy friends! I've been such a naughty blogger of late. Hopefully I didn't end up on Santa's naughty list! I plan on getting my craft groove back on after the holidays. I've missed it, but as we all know, life sometimes gets in the way. I'm wishing you all a very happy and healthy holiday season! See you soon, Jeanine
Guess who just signed up to become an Amazon Affiliate? This girl! I'm still learning the ropes, so any advice other affiliates care to share will be much appreciated! Jeanine
I dressed up this mini pail with a free printable from On Sutton Place. Sometimes I like to keep it simple. I also used tea-stained seam binding, faux moss and one of my French script candles.
It's definitely beginning to look a lot like Christmas in the Okio B house!
I actually started decorating inside a couple of weeks ago. Yes, I am that person. Ha ha. A lot of the pieces and projects you've probably seen from past Christmas posts. I switch things around though every year for a new look.
There is a touch of Christmas in just about every room in the house.
My hubby did the outside lights over the weekend. I have to snap some pics of that. He did a great job again, but we still have a few random pieces to put out.
My decorations are a mix of handmade and then pieces from Target, Ikea and Home Goods. I couldn't resist the stocking from the Gaines' Target line.
Remember these little tins from last year?! So much fun to make.
My snowman corner hutch.
I feel like this is missing a little something.
This little crate is under our tv table. I love stocking it with bits and pieces.
Last up is this little tote in the kitchen. I have to keep it simple because we don't have a lot of countertop space. Hope you enjoyed this mini Christmas tour! Jeanine
Sharing a super easy Christmas ornament you can make in 15 minutes or less!
I actually made these last year for a Christmas fair. They went over really well, but I did have some leftovers. All you need are some Jenga blocks, Scrabble tiles, a glue gun and wire (paint optional).
I started by painting some of the Jenga blocks red. Some I left plain because I think they look more rustic. Anywho, start by drilling holes on either side of the block - this is so you can add your wire. Next use your glue gun to glue the tiles onto the front of each block.
Once that's dry, you just slip your wire through the tops and coil them up at the bottom so they stay in place. You can add your own embellishments. I added the rusty bell to my JOY one (and most of the ones I sold had the bells). Super easy, right?
While I was at it, I used a vintage ruler and some Scrabble tiles to make another design. This one has a rhinestone embellishment and I used a soda tab to string some baker's twine through for easy hanging.
Think of the possibilities! You can do family names or other seasonal expressions - as long as they fit the Jenga block. This idea is floating all around the blogosphere and Pinterest, but everyone has their own take on it - and now you can add yours too! Jeanine
Disclosure: I received free product samples in exchange for posting products to this page, however, all opinions are my own.
I love, love, love paper crafts. If you're a regular follower of my blog or even a fan of my Etsy shop, you probably know how much I adore working with paper. With that said, I must confess: I'm not exactly the best paper artist. And now I don't have to be thanks to Christmas Paper Crafting from Fox Chapel Publishing!
This amazing book is chockful of ready-made holiday cards, gift tags, printables, bookmarks and more. Seriously, it offers a healthy dose of holiday inspiration on every page.
If you're like me and can't draw chalkboard print to save your life, flip to page 57 and voila! - they've already done it for you.
Or maybe you're looking for a festive printable and don't have time to peruse Pinterest. Done again! They've thought of everything you could possibly need to "craft a heartfelt card" or gift tag "for any recipient." Want to see more? Simply click on the Fox Chapel Publishing link above.
But wait it gets better...how about these cuties for the animal lover on your holiday gift list?! Cute Christmas (by Jenny Newland and William Vanderdasson) features puppies and other cuddly creatures, while Santa's Kitty Helper's (by Kayomi Harai) offers tons of adorable kitty coloring pages (both from Fox Chapel Publishing).
I know my cat lover would spend hours coloring in these pages. Meow!
Both books come with fun seasonal quotes too.
Each coloring book is a steal at just $5.99. Wouldn't they make for perfect stocking stuffers?
All books are available by visiting Fox Chapel Publishing. Jeanine Disclosure: I received free product samples in exchange for posting products to this page, however, all opinions are my own.
How excited were you when Target officially unveiled the Hearth & Hand line from Joanna and Chip Gaines? I popped into our local store over the weekend and spied this pretty Merry & Bright framed print. I loved the idea so much that I decided to make my own version.
After finding this great wreath image from the Graphics Fairy, I got busy trying to find a similar font to use for my Merry & Bright. I forgot what it's called, but this was the closest font I could find.
I printed out the wreath first onto white cardstock. Then I lined up my Merry & Bright text so it fit within the wreath. Print again - onto the cardstock with the wreath image.
I'm busy hunting down a chain I can use for my version. Mine cost $0 as I already had the frame and was able to get my wreath image for free. And I know I have a chain around here somewhere! Jeanine
I am a small business owner by day, and mom of two boys and DIY crafter by night. You might remember me from my old blog: One Cheap B*tch. I love sharing my tips and tricks to create affordable home decor, fashion, food, crafts and more! Drop me a line at spam-proof: jeanineb4etsy(at)yahoo(dotcom). Thanks for stopping by!
Jeanine
OkioBDesigns is a PR-friendly blog. If you have a product or service, you'd like to submit for review, please email me at jeanineb4etsy(at)yahoo(dotcom).
Please use the email address above for advertising rates and information.