Powered by Blogger.

Okio B Designs

A craft, food, fashion, home & shopping blog

Finally!  The sun is shining and the temperature is mild here today.  Woo hoo!  It instantly changes my mood and gets me back into crafting mode.  Last night I decided to turn this vintage sugar bowl into a pretty pin cushion.
I always seem to have a ton of fabric remnants floating around and this one reminds me of spring so I immediately grabbed it.  The sugar bowl is something my hubby found at an estate sale last year.  Last Easter I had it dressed up with faux Dollar Store moss and some eggs, but I decided to give it a more practical makeover since I'm always looking for my pins.
I used a plate to cut a fabric circle.  Then I started looping in my thread - leaving enough at the ends so I could pull it together to form my pin cushion.
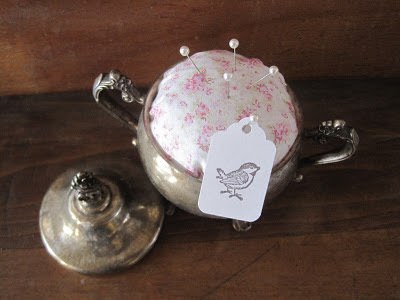
Then I filled it with Polyfil and tied my two thread ends together to close it up.  A little hot glue around the bottom of the fabric and I'm good to go!  And since spring is on my mind (obviously!), I added a little spring bird tag.  This literally took me all of 10 minutes and now I have a sweet new place to stick my pins.

Jeanine
Share
Tweet
Pin
Share
4 comments
Anyone else ready for spring?  I'm counting down the days after a horribly cold week here.  Peat pots always make me think of warmer days, so I embellished a couple over the weekend while we were staying warm indoors.
First I gave them a coat of white acrylic paint.  Then I ran some tissue paper through a printer to get these great French graphics.
I used Mod Podge to adhere them to each pot.  I love how the tissue paper seems to disappear and you're left with a beautiful image.
I finished them off with a simple faux pearl and stuffed them with faux Dollar Store moss.  They'll be ready for some spring touches in just a few weeks!

Jeanine
Share
Tweet
Pin
Share
12 comments
I was super excited to find out that a brand new Goodwill opened up just 2 minutes from my house!  The ribbon-cutting was on Wednesday, and I popped in on Thursday.  It was nice and clean but way too early for any real treasures.  A lot of Target cast-offs but I did manage to find this sweet pedestal bowl:
Not sure if you can see the etching on the sides.
I couldn't get a really great shot because of the glare but this one is a little better.  Here it is now with some candy hearts for Valentine's Day.
I also picked up these great vintage salt and pepper glass shakers.
Still trying to decide on whether or not to keep them or list them in my Etsy shop.  Decisions, decisions...As for the store, I give it another week or two before people start making more donations and I'll be back to find more goodies!  It's going to be hard not to stop in there every week.

Jeanine
Share
Tweet
Pin
Share
5 comments
Brrrrr...it's quite freezing here.  On days like this, I like to do a little online shopping since I'm not a big fan of braving the cold.  I'm still sticking with my new year's resolution of not buying stuff we don't need.  However, since I play Santa each year, these were some post Xmas gifts I bought for myself.
Don't you love this little metal mail pouch from Farmhouse Decor Shop?!  For now I have it hanging in the diningroom until I find a proper spot for it.
I was so sad when I missed the twine and scissors deal on Decor Steals a couple of weeks ago.  As luck would have it, Lucketts had it too, so I was able to scoop it up afterall!
These are some finds from my Mom's local Goodwill.  I believe the square cloche is a butter dish from Home Goods.  I'm going to use it as, well, a cloche.  The little salt shaker looked so sad on its lonesome, so I grabbed it for 59 cents.  I'm going to add some lace and make it more pretty.

I have my eye on a few other online treasures...

Jeanine
Share
Tweet
Pin
Share
5 comments
It's snowing here and boy am I glad I was able to get in some spray painting on Saturday before the temperature dropped!  This is another salvaged piece from my late mother-in-law's house.  She had some dried flowers in there but I took it a part and gave it a quick makeover.
The frame was originally gold but I gave it two coats of flat white spray paint.  While that was drying, I used a bit of osnaburg fabric and this great French bee image that is floating all around Pinterest (thankfully my sister Kathy from Creative Home Expressions pinned it!).
I printed the image onto transfer paper and simply ironed it onto my fabric.  Then I hot glued the entire fabric insert (glued onto a piece of cardboard) back into the frame.  I didn't even put the glass back in.
I have it propped up in our guest room for now with a collection of crowns from Decor Steals.   Wish I would have centered the crown transfer more with the top of the frame but I can live with it.   I love how the osnaburg gives it a burlap look.

Jeanine
Share
Tweet
Pin
Share
6 comments
There is just something about these petite cups and saucers that scream Valentine's Day to me.  They were my mother-in-law's.  We saved them from the house after the hurricane and my bad, they've been sitting in our garage for weeks.
I broke them out today and played around with them a bit.  They are just too sweet to put away.
She had them on a metal stand which is a bit rusty now.  I'm trying to figure out what color to paint it.  Gold maybe?
Some cupcakes with your tea?  Of course these are candles from Home Goods - bought them a couple of years ago.  But they do look delish.
And a proper lady always has a hanky to dab the sides of her mouth.
I found some vintage ones at a church thrift store.
Yes, some hot tea sounds good right about now.

Jeanine
Share
Tweet
Pin
Share
2 comments

Sweet and simple for Valentine's Day.  Romeo & Juliet book paper, stamps, key and red tea-stained seam binding.  Heart image from the Graphics Fairy.  Down with another winter cold and all I could muster up.  =)

Jeanine
Share
Tweet
Pin
Share
3 comments
I've been super curious about using waterslide decal paper in my crafts.  As luck would have it, my boys needed it for their Cub Scout derby cars.  I found some on eBay and put aside a few sheets for them and for myself.  I tried it last night and I can tell you, I'm already hooked!
I used this thrift store terrarium that I picked up last week.  It was black but I gave it some coats of white paint over the weekend. 
To do the waterslide method, you, of course need the special paper.  I bought inkjet sheets for mine.  I printed this wonderful image from the Graphics Fairy onto the sheet.  No need to reverse or mirror the image for this paper.
I gave it a couple of coats of clear spray paint to seal in the image.  Once your spray paint is dry, fill a shallow bowl with water.  Put your image in for 1 minute.  Mine curled at first so I had to hold it down.  I also wasn't sure how the decal came off so I started trying to peel the white paper.  Nope, the decal is a see-through film so that's what you're looking to separate from the paper backing.
Peel the film from the backing - be careful because it curls rather quickly.  Add it to your surface and use a sponge to work out the air bubbles.  That took a little time and my corners kept folding under but I carefully unfolded them so everything sat flush.

I have to say I love this method more than the Mod Podge method which I just haven't been able to master.  I have a few more sheets left and I can't wait to brainstorm some new places to use them.  Email me if you need any more tips!

Linking to The Graphics Fairy: Brag Monday.

Jeanine
Share
Tweet
Pin
Share
7 comments
Another dreary weekend in our neck of the woods.  Not very conducive in the inspiration department.  I broke out the last of my Dollar Store match boxes and gave them a quick Valentine's Day spin using some vintage Romeo & Juliet book paper.
My mother would kill me if she saw how I tear apart books but sometimes I just can't resist.
I cut each page to fit the size of the match boxes.  Then I used some regular craft glue - the kind my boys use at school - and glued the pages onto each box. 
Then I added some random heart stamps, je t'aime, lace and a button.  Simple and sweet.  My favorite is the one with the pierrot image from the Graphics Fairy.  I've used it in several Valentine's Day projects as you probably noticed.

Rain again for tomorrow.  I'm hoping something, anything will get my creative juices flowing again.

Jeanine
Share
Tweet
Pin
Share
No comments
Once again drawing inspiration from Pinterest for this little project.  I had bought a couple of paper mache-ish top hats before the holidays.  I never got around to decorating them for Xmas.  Plan B: use them for Valentine's Day!
I only have this one finished so far.  It's the bigger of the two I bought.  I used some vintage sheet music for the top and brim.  Wow, what a pain that was! 
Then I covered the sheet music in Mod Podge and just sprinkled on some glitter which is hard to see in the photos - but it's there!  The lace is actually from a shirt I bought 5 years ago from Newport News.  It was sheer and lacey and something I hadn't worn in, well, 5 years.  I snipped off some of the bottom and tied it on.
Then I added the LOVE lettering and cupid image (from Etsy).  They are not glued on, just kind of tucked in so I can reuse my hat over and over again.  I mean, Easter is early this year!

I'm still working on the smaller one - hopefully I can finish it over the weekend.

Jeanine
Share
Tweet
Pin
Share
8 comments
I picked up this petite wood tray last week at our local church thrift store.  Since it was a bit mild here over the weekend, I was able to give it a couple of coats of white spray paint.  I really struggled trying to figure out what I wanted to do with it.
I didn't want to Mod Podge an image on the sides since they are so skinny.  Instead, I opted for the faux French enamel number tag.  I think it fits quite nicely on the front.  Simple.
I added some vintage sheet music to the bottom of the tray.  Not sure if you can see it tucked in there under the clothes pins.
Then I just added some random pieces to make a sweet French vignette of sorts.  One of my embellished bottles.  A religious pendant on the clothes pins.  A faux pocket watch.  French address tags (image from The Graphics Fairy).  Old dice and a spool with French book paper.
It's on a corner of the kitchen counter that is always begging for something pretty to be added.  Since it's so petite, it fits quite nicely and really doesn't take up much space.

Jeanine
Share
Tweet
Pin
Share
7 comments
I had an extra box of these tin stars I got from Ikea before Christmas.  I wanted to add a Valentine's Day touch to them so I headed over to The Graphics Fairy for these wonderful French pierrot clown images.
I printed them out onto cardstock and used Glue Dots to stick them on.  I'm debating on whether or not to add red tea-stained seam binding or leave the twine.  I kind of like the twine.
I'm displaying them in this cloche that I had filled with some pine cones for Xmas.
It was a garage sale find from the summer.  I painted it white and added the Paris postmark - which is coincidentally also from The Graphics Fairy.  They fit perfectly!

Really hoping Blogger gets its act together this week.  I'm not sure if you've been having issues with uploading photos but I have...again.  You have to add them using html which is such a pain for me.  Sigh!

Linking to The Graphics Fairy: Brag Monday and Between Naps on the Porch: Met Monday.

Jeanine
Share
Tweet
Pin
Share
4 comments
All you need is love, love...love is all you need!
Scrabble tile magnets.

Stencil letters.

Wood letters.

Yup, it's beginning to look a lot like Valentine's Day in our house.

Jeanine
Share
Tweet
Pin
Share
4 comments
I had my eyes on these since last year and now I think they are sold out. 
Image courtesy PotteryBarn.com

Pottery Barn's LOVE votive candle holders.  If I recall, they were over $40 for the set.  Wha???????  Check out my $4 DIY knock-off version.
Of course I still have to add candles to mine.  Super easy to make, though.  I used the carnival font (the one I am so clearly fond of!) from DaFont.com.  I typed them into a simple Word document.  Space them out a bit because next you're going to print them onto clear label paper.
Simply peel and stick to your votives.  You can probably trim your label paper to your liking.  I don't mind the extra showing on mine.  Up close it actually makes the glass look frosted.

Not bad for $4.  The votives are from Michael's at 99 cents a piece.  I had a coupon so they were actually even cheaper than that.  The clear label paper is about $19 for a pack of 20 sheets but since I already had some - I spent zero on that.

What do you think compared to the PB ones?  Four dollars is definitely more my speed - especially given my new year's resolution on watching my spending.

Jeanine
Share
Tweet
Pin
Share
4 comments
The Xmas decorations are tucked away and a new year has begun.  Valentine's Day is just a few weeks away and I can already feel the love!  It's been bitterly cold here - the perfect weather for staying indoors and crafting.  I whipped up two banners over the weekend that I plan to use for Valentine's Day.
This sweet Marie Antoinette image is from Etsy.  I've used it in several projects and never tire of it.  For the banner, I printed it out on cardstock, punched some holes at the top of each card and slipped through some tea-stained seam binding so it could be hung.
I added some pink glitter around the edges of each card.  A faux pearl is the cherry on top of the cake.  Next up is this LOVE banner I made using some vintage Romeo & Juliet book paper.
This is the same font I used for my Xmas NOEL banner.  It was a little tricky lining up each letter on the paper, but I think I have it mastered now.  Again, I punched some holes at the tops of each page so I could add my tea-stained seam binding.
I just love the vintage lettering, don't you?  I'll be using it again for a Pottery Barn knock-off project this week.

Jeanine
Share
Tweet
Pin
Share
4 comments
Newer Posts
Older Posts

About Me

My photo
Okio B Designs
I am a small business owner by day, and mom of two boys and DIY crafter by night. You might remember me from my old blog: One Cheap B*tch. I love sharing my tips and tricks to create affordable home decor, fashion, food, crafts and more! Drop me a line at spam-proof: jeanineb4etsy(at)yahoo(dotcom). Thanks for stopping by! Jeanine
View my complete profile

Shop the Post

Follow Me on LikeToKnow.It

liketoknow.it/OkioBDesigns

Follow Me on Pinterest!

Follow Me on Pinterest

Follow Me on Instagram!

Instagram

Follow Me on Twitter

Tweet

PR/Advertising

OkioBDesigns is a PR-friendly blog. If you have a product or service, you'd like to submit for review, please email me at jeanineb4etsy(at)yahoo(dotcom).


Please use the email address above for advertising rates and information.


My tool caddy in Romantic Homes

My tool caddy in Romantic Homes

Good Housekeeping August 2011

Good Housekeeping August 2011

Search This Blog

Blog Archive

  • ►  2025 (3)
    • ►  February (2)
    • ►  January (1)
  • ►  2024 (7)
    • ►  July (1)
    • ►  June (2)
    • ►  May (2)
    • ►  April (1)
    • ►  January (1)
  • ►  2023 (21)
    • ►  December (5)
    • ►  November (2)
    • ►  September (1)
    • ►  August (1)
    • ►  July (3)
    • ►  June (1)
    • ►  May (4)
    • ►  April (3)
    • ►  January (1)
  • ►  2022 (23)
    • ►  December (3)
    • ►  November (4)
    • ►  September (2)
    • ►  August (1)
    • ►  July (2)
    • ►  June (4)
    • ►  April (1)
    • ►  February (3)
    • ►  January (3)
  • ►  2021 (49)
    • ►  December (7)
    • ►  November (3)
    • ►  October (3)
    • ►  September (4)
    • ►  August (3)
    • ►  July (4)
    • ►  June (3)
    • ►  May (4)
    • ►  April (8)
    • ►  March (4)
    • ►  February (2)
    • ►  January (4)
  • ►  2020 (37)
    • ►  December (10)
    • ►  November (11)
    • ►  October (5)
    • ►  September (2)
    • ►  August (1)
    • ►  July (2)
    • ►  April (3)
    • ►  February (2)
    • ►  January (1)
  • ►  2019 (40)
    • ►  December (1)
    • ►  November (4)
    • ►  October (5)
    • ►  September (4)
    • ►  August (1)
    • ►  July (2)
    • ►  June (5)
    • ►  May (3)
    • ►  April (5)
    • ►  March (2)
    • ►  February (3)
    • ►  January (5)
  • ►  2018 (43)
    • ►  December (4)
    • ►  November (5)
    • ►  October (7)
    • ►  September (4)
    • ►  August (1)
    • ►  July (1)
    • ►  June (6)
    • ►  May (2)
    • ►  April (3)
    • ►  March (1)
    • ►  February (4)
    • ►  January (5)
  • ►  2017 (44)
    • ►  December (5)
    • ►  November (5)
    • ►  October (3)
    • ►  September (3)
    • ►  August (2)
    • ►  July (4)
    • ►  June (4)
    • ►  May (3)
    • ►  April (3)
    • ►  March (3)
    • ►  February (5)
    • ►  January (4)
  • ►  2016 (58)
    • ►  December (5)
    • ►  November (5)
    • ►  October (7)
    • ►  September (7)
    • ►  August (4)
    • ►  July (4)
    • ►  June (2)
    • ►  May (2)
    • ►  April (6)
    • ►  March (3)
    • ►  February (6)
    • ►  January (7)
  • ►  2015 (89)
    • ►  December (4)
    • ►  November (7)
    • ►  October (6)
    • ►  September (8)
    • ►  August (7)
    • ►  July (8)
    • ►  June (8)
    • ►  May (6)
    • ►  April (7)
    • ►  March (9)
    • ►  February (9)
    • ►  January (10)
  • ►  2014 (152)
    • ►  December (10)
    • ►  November (11)
    • ►  October (13)
    • ►  September (11)
    • ►  August (8)
    • ►  July (16)
    • ►  June (17)
    • ►  May (12)
    • ►  April (13)
    • ►  March (13)
    • ►  February (14)
    • ►  January (14)
  • ▼  2013 (199)
    • ►  December (15)
    • ►  November (15)
    • ►  October (15)
    • ►  September (15)
    • ►  August (15)
    • ►  July (17)
    • ►  June (19)
    • ►  May (18)
    • ►  April (18)
    • ►  March (18)
    • ►  February (19)
    • ▼  January (15)
      • Vintage Sugar Bowl Pin Cushion
      • Frenchy Peat Pots
      • Goodwill Finds
      • Retail Therapy
      • Upcycled Oval Frame
      • Care for a Spot of Tea?
      • The Key to My Heart
      • My First Attempt Using Waterslide Decal Paper
      • Romeo & Juliet Match Boxes
      • Sheet Music Top Hat
      • Thrifty Tray Makeover
      • French Pierrot Clown Stars
      • Can You Feel the Love?
      • Pottery Barn Knock-Off: Love Votive Candle Holders
      • Valentine's Day Banners
  • ►  2012 (186)
    • ►  December (19)
    • ►  November (14)
    • ►  October (18)
    • ►  September (16)
    • ►  August (10)
    • ►  July (14)
    • ►  June (17)
    • ►  May (15)
    • ►  April (14)
    • ►  March (15)
    • ►  February (17)
    • ►  January (17)
  • ►  2011 (118)
    • ►  December (17)
    • ►  November (19)
    • ►  October (12)
    • ►  September (9)
    • ►  August (8)
    • ►  July (17)
    • ►  June (25)
    • ►  May (11)

Created with by ThemeXpose