Powered by Blogger.

Okio B Designs

A craft, food, fashion, home & shopping blog

Away went the Halloween decorations and out came the Xmas decorations this weekend.  No, just kidding!  Although I did hear Xmas music on the radio already, which was perfect for my trio of upcycled Santas.
Well, the Santas themselves aren't quite upcycled.  The pieces I used to make them are: a Pringles canister, an old Hershey's tin and a random tin we had floating around the house.
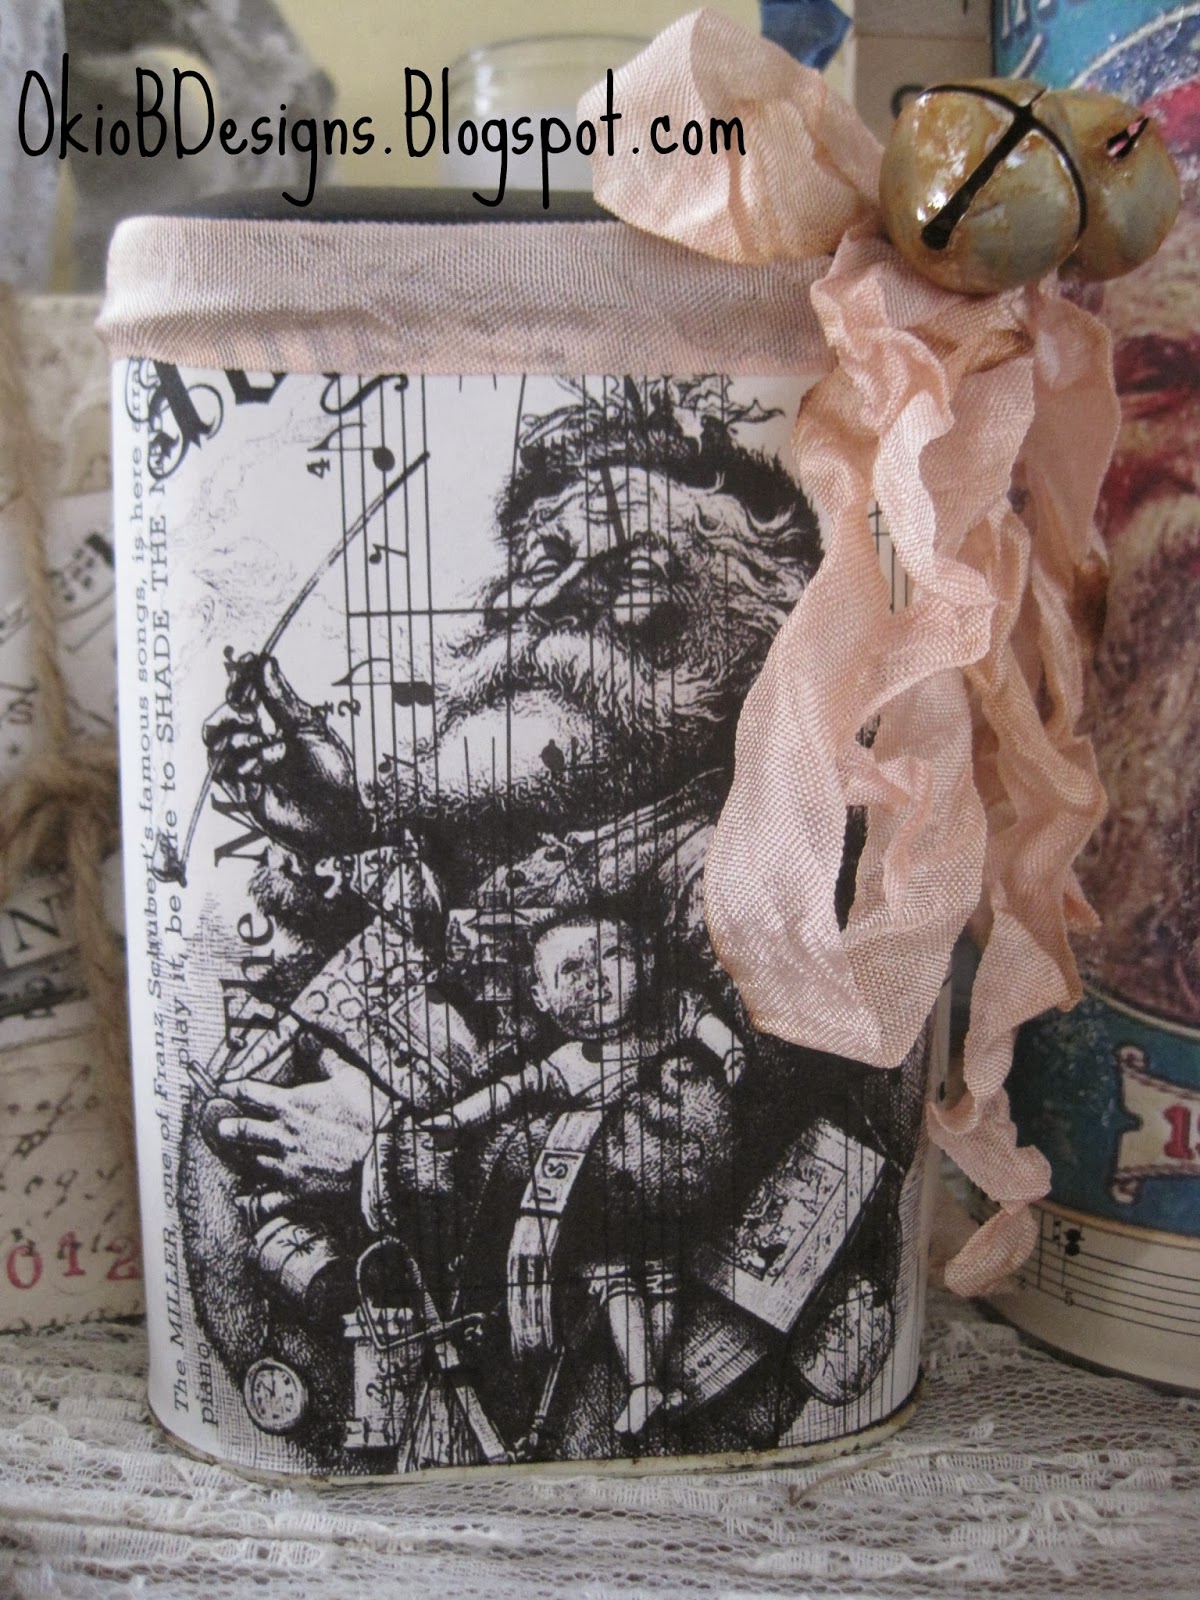
I really love how this guy turned out.  First I printed out the image onto sheet music.  Then I glued it around my Hershey's tin.  Once that was dry, I added some pink, yes pink, tea-stained seam binding around the lid.  I used some to tie a bow to add my rusty jingle bells.  I like using non-traditional holiday colors these days.  Red and green just don't seem to cut it for me anymore.
This tin is actually from a Spongebob card game my 6 year old.  I was shocked when he said I could have it.  Before he changed his mind, I quickly gave it a few coats of white spray paint to start.  I glued in some vintage book paper.  The Santa and reindeer are from The Graphics Fairy.  Not sure if you can see, but I finished it up with German glass glitter in random spots and lace around the edges.
And here we have my second ever Pringles makeover.  The first one I did had a Frenchy touch.  This one includes another great Santa image from The Graphics Fairy.  I covered the canister with sheet music and then added my Santa image.  This one has blue and white tea-stained seam binding.
And Xmas spelled out with Scrabble letters.  The letters are actually glued onto the seam binding.  I'm shocked they're staying on so well!  I finished this one up with some German glass glitter as well. I can't wait to put these guys out later this month.

Linking to The Graphics Fairy: Brag Monday and Between Naps on the Porch: Met Monday.

Jeanine
Share
Tweet
Pin
Share
4 comments
I can't believe there are 10 more days until Christmas!  I made a couple of last minute holiday pieces yesterday.  Both from the Dollar Store:
These itty bitty candles are maybe 2 inches tall.  I printed out the great vintage image from The Graphics Fairy (wallet-size!) and used Mod Podge to glue them to the glass.  After the second coat dried, I simply added two little red rhinestones which I think work perfectly with the vintage image.
This is my last little Dollar Store birdie.  I think I bought every single one when they first came out two years ago.  I gave her a fresh coat of white paint.
Then I used my Mod Podge again to add some German glass glitter all over.  I love how she sparkles!
I have a couple more holiday items planned and then I guess I'll be moving on to, gulp, Valentine's Day!  =)

Linking to The Graphics Fairy: Brag Monday.

Jeanine
Share
Tweet
Pin
Share
8 comments
In the midst of all of my holiday shopping madness, I sat down over the weekend and made myself a little something for all of $2!  Yup, I'm such a big spender - lol:
This is a simple Dollar Store prayer candle with a fabulous Keep Calm and Carry On image that I got off of Etsy for...$1 (graphique.etsy.com) that I Mod Podged on.  I am keeping to a tight Xmas gift budget this year but figured I could splurge $2 on myself.  I even had the little rhinestone on hand for the crown embellishment.
It's the little things that sometimes make you very happy - and calm! - during the holiday madness.  And I think it would make for a sweet gift for perhaps a teacher, an Aunt, Grandma or Mom.
I'm also in the midst of playing around with decorations for my Xmas table.  The little stack of books is from Home Goods.  I painted a peat pot white for a shabby, chippy look and filled it with shredded sheet music.  The little button embellishments I got from a giveaway last year.  And I couldn't resist adding the French script, tea-stained seam binding and little crown.
My 6 year old suggested adding the little bird since he thought it looked like an Xmas nest.  I couldn't agree more!

Linking to Faded Charm: White Wednesday.

Jeanine
Share
Tweet
Pin
Share
7 comments
***You still have time to enter my giveaway here!***

After searching just about every Dollar Tree in a 10 mile radius for bottle brush trees, I was just about to give up.  Luckily, I popped into Home Goods this morning and lookie what they had:
I'm so happy that I found these two pretties!  And I love the fact that I really don't have to do anything to them.  Right now they are on a shelf in my livingroom - right next to a Dollar Store birdie I picked up last year.
I also couldn't resist these little books this morning.  They were only $4.99 each.  I have them stacked on the diningroom table for now.
These are some other Xmas goodies I picked up from Home Goods last year. 
And here's a view of my Xmas kitchen window shelf which is kind of like a make-shift mantel since I don't have one:
A lot more Home Goods goodies from last year here too!
The Crown is a recent Home Goods find.  Not sure if you can tell but it's filled with some small Xmas bulbs. 

Am I the only one humming: "Oh it's beginning to look a lot like Christmas..." these days?!  =)

Jeanine
Share
Tweet
Pin
Share
7 comments
Hope everyone had a lovely Thanksgiving yesterday.  We enjoyed a nice, quiet, peaceful day at my Mom's.  I needed the relaxation because today I officially started to decorate for Xmas.
These are just little packages to put under our tree (which hasn't gone up yet) while we countdown to the 25th.  With two little boys who still believe in Santa, I can't have the actual gifts under the tree so I decided to do some faux ones so it doesn't look bare under there.  You can probably also see the shabby bucket I did a week or so ago.  It's pleasantly filled with some red plastic ornaments from Ikea.
This is just a little envelope I made from some vintage sheet music.  Got the inspiration from Pinterest.  I sewed up the sides to keep it closed, and then added the button, baker's twine and jingle bell.  The little tag says: "To Wish You Joy at Christmas."
Next I did a large Dollar Store matchbox - also with some vintage sheet music.  I tied this one up with twine for a more rustic look.  The "Compliments of the Season" tag I made using an image from The Graphics Fairy.
Lastly is this little shipping box that I wrapped in simple brown craft paper.  The Santa image is also from The Graphics Fairy.  I used some Ikea candy cane-striped twine for this one and added some faux greenery from the Dollar Store.

I have a bunch more to make and what's so nice is you can use any type of simple box.  Maybe even one that you might have otherwise thrown out!

Linking to The Graphics Fairy: Brag Monday and Funky Junk Interiors:SNS.

Jeanine
Share
Tweet
Pin
Share
9 comments
Because sometimes you just want to keep it simple:
Vintage scale, petite cloche with bird, white Xmas tree and a simple white candle which reads:
I am at Peace.
Linking to Faded Charm: White Wednesday.  There is still time to enter my giveaway here!

Jeanine
Share
Tweet
Pin
Share
10 comments
I'm pretty sure I saw this idea in Martha Stewart Living.  I had the bags.  I had the number stamps so it was really a no brainer and the kids think it's the coolest:
This is just a temporary hanging place.  I'm still not sure where to hang them from nosey little hands.  I got the striped bags off of Etsy over the summer and wouldn't you know it - there was exactly 25 of them. 
So I stamped each one and then divided them into fours so I didn't have some ginormous (is that even a word - lol?!) banner to hang up.  I don't know if you can tell but I hung them with some of my Joyeux Noel clothes pins.

The boys are very excited to fill them and then of course eat whatever goodies we add.  I think it makes for a sweet countdown to Xmas this year!

Jeanine
Share
Tweet
Pin
Share
3 comments
First I wanted to send a big thank you out to Karen at The Graphics Fairy for featuring my sled on today's Brag Monday.  It really made my day!  And thank you to everyone who left such lovely comments about it!
And now onto today's project.  I had a ton of leftover Dollar Store matchboxes from two years ago.  Yup, you read that right.  I bought them two years ago to do a copycat Country Living advent calendar and a bunch of them were still hanging around:
Today I wrapped each one in vintage sheet music and tied some with twine, and red, green and silver ribbon.  Some I just left plain, while others I stamped joyeux noel on or added a simple rhinestone.
Then I added some shredded sheet music to my apothecary jar.  Just enough to bulk up the bottom of the jar.  Then I carefully added each matchbox so they settled nicely on top.  I grabbed my favorite plaid fabric - yes the same one from the church thrift store fair! - and tied that to the front of the jar.
Oh yes, it's beginning to look a lot like Xmas here.  I am waiting until after Thanksgiving to decorate but it is getting harder and harder!

Linking to: Coastal Charm: Nifty Thrifty Tuesday and My Uncommon Slice of Surburbia: Tuesdays Treasures.

Jeanine
Share
Tweet
Pin
Share
8 comments
I popped into my local Goodwill earlier this week and came back with a lot of goodies:
The bucket was only 99 cents. 
The candle holder was $6.99 - pretty pricey for Goodwill but I couldn't resist considering it came from Target where it was probably originally double the price.  I also got 5 little bottles that I plan to embellish.  First makeover is the bucket:
Can you tell I ran out of white spray paint?!  I had originally wanted to paint it white but I just ran out of it, so plan B of course was to paint it black.  Then I stenciled the 8 onto to some scrap fabric with a fabric marker.  Once that was dry, I sewed it onto a piece of burlap.  Hot glue to the front and done!  Right now it's holding some of my French script clothes pins.

Next up is the candle holder which I really didn't do too much to except that I added some of my hand-stamped joyeux noel candles.
I think it's going to look stunning on my Xmas table!
Linking to Between Naps on the Porch: Met Monday.

Jeanine
Share
Tweet
Pin
Share
10 comments
Got to play Martha Stewart yesterday.  Well, not really but I did use the fabulous stocking template mentioned in the December issue of Martha Stewart Living.  You have to go to: marthastewart.com/stocking-template to download and print it, and then you get to make one of these:
I used the larger template for this stocking.  I have been wanting to do a burlap stocking for the past two years.  I don't know why I never did one before because I do love the rustic look of burlap and lord knows I have a ton of it left over from other projects.  Seeing the stockings in MSL gave me just the nudge I needed.
I added the white wood B (for our last name) with a grungy red safety pin.  You probably can't tell but I used a little brown paint to distress it a bit and then sanded it here and there.  I'm planning on stuffing the bottom of the stocking with tissue paper and then adding little wrapped "presents" or other Xmas-appropriate goodies for a kind of "spilling" from the top look.  This will probably go on our front door this year in lieu of a wreath.

I also printed off the smaller MSL template which I plan on using with some of the fabric I got at the church thrift store fall fair last weekend.

Jeanine
Share
Tweet
Pin
Share
3 comments
I'm still happily transforming some of the goodies I got at my local church's thrift store sale a couple of weeks ago.  The sled was my first transformation, and yesterday I put the finishing touches on these cute shaker boxes:
I spray painted both of them black.  Once they were dry, I added some vintage sheet music to each top.
Then I tied them together with some of the plaid fabric I also got at the fair.  Like the sled, I used the faux Dollar Store berries and pine cone as toppers.

I think these will look lovely stacked up on our faux fireplace this year!

Jeanine
Share
Tweet
Pin
Share
3 comments
I was at my local Marshall's last week and could not believe the gorgeous wrapping paper they have this year!  Lookie what I picked up.  It's so pretty that I actually framed it:
I really am a sucker for sheet music and I can see lots and lots of faux presents under the tree wrapped in this paper.
I have some other plans for it on some petite boxes and such. 

And of course I can't wait to wrap some real presents with it!

Jeanine
Share
Tweet
Pin
Share
12 comments
It was a bit mild here today so I was able to get outside and do some spray painting.  First up was the little wood sled I got last weekend at a church thrift store fall festival.  I gave it a few coats of black paint:
Then I sanded some random edges to give it a more shabby look.  I traced some sheet music around the "seat" part and cut it out.  Break out the Mod Podge and add a coat to stick it to the wood and then another coat to seal it in.
While the Mod Podge was drying, I printed off the great vintage Santa image from the Graphics Fairy.  I glued that to the middle of the sheet music.
Then I tied on some twine and tea-stained red seam binding.  The faux pine cone and berries, I picked up from the dollar store.  Just slip that under the twine and seam binding.  Final touch was the joyeux noel tag clipped on with a French script clothes pin.

I may or may not add some glitter for a more sparkly look but I'm really pleased overall with the final look!  P.S. Now that my new blog has reached 200 followers, I'll be putting together that giveaway I mentioned a week or so ago!

Linking to Between Naps on the Porch: Met Monday and The Graphics Fairy: Brag Monday.

Jeanine
Share
Tweet
Pin
Share
17 comments
Yup, it's snowing here today.  Can you believe it?!  No real accumulation but enough to make it messy.  It wasn't messy enough to keep me from my favorite church thrift store's annual fall fair.  Popped over there this morning and it did not disappoint:
How cute is the snowman?  I got it for $1.  One booth allowed you to fill a bag for a buck.  I could have gone to town but I tried to hold myself back so I wouldn't feel more guilty than I already did.  I always give them a few bucks extra because it's for such a great cause.
I got two styrofoam Xmas trees, one styrofoam wreath that I am determined to do something grand with this year, two little wreaths, tons of holiday-ish fabric, a little box and some twine.
Then I spied the little wood sled for $1 and the scented wreath - also $1.  The little candy tin was 50 cents.  I'm picturing the sled painted either black or white and then covered in vintage sheet music with a fabulous Graphics Fairy image in the middle.

Still trying to decide what to do with the box and candy tin but I'm sure those two makeover will include sheet music.

Jeanine
Share
Tweet
Pin
Share
4 comments
Older Posts

About Me

My photo
Okio B Designs
I am a small business owner by day, and mom of two boys and DIY crafter by night. You might remember me from my old blog: One Cheap B*tch. I love sharing my tips and tricks to create affordable home decor, fashion, food, crafts and more! Drop me a line at spam-proof: jeanineb4etsy(at)yahoo(dotcom). Thanks for stopping by! Jeanine
View my complete profile

Shop the Post

Follow Me on LikeToKnow.It

liketoknow.it/OkioBDesigns

Follow Me on Pinterest!

Follow Me on Pinterest

Follow Me on Instagram!

Instagram

Follow Me on Twitter

Tweet

PR/Advertising

OkioBDesigns is a PR-friendly blog. If you have a product or service, you'd like to submit for review, please email me at jeanineb4etsy(at)yahoo(dotcom).


Please use the email address above for advertising rates and information.


My tool caddy in Romantic Homes

My tool caddy in Romantic Homes

Good Housekeeping August 2011

Good Housekeeping August 2011

Search This Blog

Blog Archive

  • ▼  2025 (3)
    • ▼  February (2)
      • ~happy monday~
      • ~antiqued dollar tree frames~
    • ►  January (1)
  • ►  2024 (7)
    • ►  July (1)
    • ►  June (2)
    • ►  May (2)
    • ►  April (1)
    • ►  January (1)
  • ►  2023 (21)
    • ►  December (5)
    • ►  November (2)
    • ►  September (1)
    • ►  August (1)
    • ►  July (3)
    • ►  June (1)
    • ►  May (4)
    • ►  April (3)
    • ►  January (1)
  • ►  2022 (23)
    • ►  December (3)
    • ►  November (4)
    • ►  September (2)
    • ►  August (1)
    • ►  July (2)
    • ►  June (4)
    • ►  April (1)
    • ►  February (3)
    • ►  January (3)
  • ►  2021 (49)
    • ►  December (7)
    • ►  November (3)
    • ►  October (3)
    • ►  September (4)
    • ►  August (3)
    • ►  July (4)
    • ►  June (3)
    • ►  May (4)
    • ►  April (8)
    • ►  March (4)
    • ►  February (2)
    • ►  January (4)
  • ►  2020 (37)
    • ►  December (10)
    • ►  November (11)
    • ►  October (5)
    • ►  September (2)
    • ►  August (1)
    • ►  July (2)
    • ►  April (3)
    • ►  February (2)
    • ►  January (1)
  • ►  2019 (40)
    • ►  December (1)
    • ►  November (4)
    • ►  October (5)
    • ►  September (4)
    • ►  August (1)
    • ►  July (2)
    • ►  June (5)
    • ►  May (3)
    • ►  April (5)
    • ►  March (2)
    • ►  February (3)
    • ►  January (5)
  • ►  2018 (43)
    • ►  December (4)
    • ►  November (5)
    • ►  October (7)
    • ►  September (4)
    • ►  August (1)
    • ►  July (1)
    • ►  June (6)
    • ►  May (2)
    • ►  April (3)
    • ►  March (1)
    • ►  February (4)
    • ►  January (5)
  • ►  2017 (44)
    • ►  December (5)
    • ►  November (5)
    • ►  October (3)
    • ►  September (3)
    • ►  August (2)
    • ►  July (4)
    • ►  June (4)
    • ►  May (3)
    • ►  April (3)
    • ►  March (3)
    • ►  February (5)
    • ►  January (4)
  • ►  2016 (58)
    • ►  December (5)
    • ►  November (5)
    • ►  October (7)
    • ►  September (7)
    • ►  August (4)
    • ►  July (4)
    • ►  June (2)
    • ►  May (2)
    • ►  April (6)
    • ►  March (3)
    • ►  February (6)
    • ►  January (7)
  • ►  2015 (89)
    • ►  December (4)
    • ►  November (7)
    • ►  October (6)
    • ►  September (8)
    • ►  August (7)
    • ►  July (8)
    • ►  June (8)
    • ►  May (6)
    • ►  April (7)
    • ►  March (9)
    • ►  February (9)
    • ►  January (10)
  • ►  2014 (152)
    • ►  December (10)
    • ►  November (11)
    • ►  October (13)
    • ►  September (11)
    • ►  August (8)
    • ►  July (16)
    • ►  June (17)
    • ►  May (12)
    • ►  April (13)
    • ►  March (13)
    • ►  February (14)
    • ►  January (14)
  • ►  2013 (199)
    • ►  December (15)
    • ►  November (15)
    • ►  October (15)
    • ►  September (15)
    • ►  August (15)
    • ►  July (17)
    • ►  June (19)
    • ►  May (18)
    • ►  April (18)
    • ►  March (18)
    • ►  February (19)
    • ►  January (15)
  • ►  2012 (186)
    • ►  December (19)
    • ►  November (14)
    • ►  October (18)
    • ►  September (16)
    • ►  August (10)
    • ►  July (14)
    • ►  June (17)
    • ►  May (15)
    • ►  April (14)
    • ►  March (15)
    • ►  February (17)
    • ►  January (17)
  • ►  2011 (118)
    • ►  December (17)
    • ►  November (19)
    • ►  October (12)
    • ►  September (9)
    • ►  August (8)
    • ►  July (17)
    • ►  June (25)
    • ►  May (11)

Created with by ThemeXpose