Powered by Blogger.

Okio B Designs

A craft, food, fashion, home & shopping blog

I used to love playing with paper dolls when I was little.  I used to make my own by cutting the models out of my Mom's Spiegel catalog (remember Spiegel?????).  This one I found on Pinterest and couldn't resist!
I printed the template out onto cardstock and cut each part out.  Then I used some brads so her arms and legs would be moveable.  I hand-stamped the Paris on, and added a little bling.
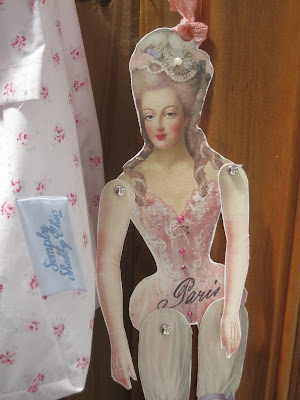
She's really sweet and I would have loved to play with her when I was little.  For now, she's just kind of hanging out.

Jeanine
Share
Tweet
Pin
Share
3 comments
Hope everyone is having a lovely weekend.  I didn't have much crafting time this week due to some wholesale Etsy orders, but I did manage to pop into Michael's and pick up these incredibly cute mini chalkboards:
I added some magnet stickers to some of them so I could hang them on the fridge.  I love the color!  I even used some to hang these great old family photos my parents gave me this week.
The black and white one is of my grandfather and his family on my dad's side.  The color one is my grandfather from my mom's side.  I miss them both!  =(
I didn't have time to paint this little guy.  And of course I noticed the smudgy thing on the right after I altered it with some French poetry pages.  Doh!
Here's a closer look.  I just distressed the book page and mod podged them on the top and the bottom.  I think the French perks it up a bit, don't you?

Both the mini chalkboard clips and the one on the stand were in the dollar bins at Michael's.  Sweet!

Jeanine
Share
Tweet
Pin
Share
No comments
This is another redo of a redo project.  We had this slate plaque for years.  It had some horrible "welcome" design on it originally.  I had painted it white and then added a vintage coffee label sticker from the Graphics Fairy.  Unfortunately, the label peeled off due to the heat so I had to start over from square one:
I gave it a few more coats of white spray paint.
Then I printed out this great French address from the Graphics Fairy.  I used graphite paper to stencil it on.  Then I sanded down the wording to give it an aged look.
I gave it a coat of clear spray paint to protect it, and added the twine so I could hang it up.  It's right over a basket of lavender in the tearoom.  Yum!

Linking to The Graphics Fairy: Brag Monday.

Jeanine
Share
Tweet
Pin
Share
4 comments
I wanted to dress up these burlap pouches that I've had forever.  I knew I wanted to add some fabric to the front but I just didn't want to got through the hassle of sewing it on.  I just don't know how to maneuver through the pouch without getting frustrated.  Plan B: fabric glue!
I hand-stamped my bird images onto each piece of fabric first.  One has Paris at the bottom and the other je t'aime.  I used a cherry pink ink for both which I think matches quite nicely with the pinks in the fabric.
Then I lined up each fabric piece onto the burlap front (I put a card in between so the burlap wouldn't glue together, thus, rendering the pouch useless) and simply glued it on.  Yeah, I'm easy like that.
Once that was dry, I glued on the vintage lace to the bottoms.  I added a grungy red safety pin to one - just because.  I tucked in some vintage French poetry paper in both.
I have one displayed in a basket I picked up last weekend at my sister's favorite Long Island store: Lavender Fields (hey, Kath, they are moving!).  I put the other one on a bookshelf.

Not having to go through the hassle of sewing: priceless!

Jeanine
Share
Tweet
Pin
Share
2 comments
We found these vintage salt & pepper shakers at a garage sale a few months ago.  They are silver-plated and screw off to reveal a glass holder for both the salt and pepper.  Really unique.  I wanted to give them a Frenchy makeover:
First I added my favorite vintage lace with some hot glue.  Then I added the metal picture holders to each one.  I was thrilled that they actually fit into the existing holes.
I used some distressed French book paper underneath the lace.  I also added some faux pearl embellishments and tea-stained seam binding.
I added the religious medal to one and the je t'aime notecard to the other.
I love the shabby French feel of them!

Jeanine
Share
Tweet
Pin
Share
6 comments
I bought this frame for $1 at a local thrift store a few months ago.  I had spray painted it white and that's about as far as I got.  Yesterday, I decided to turn it into a burlap message board:
I cut a piece of foam board to fit the frame.  Then I used some spray glue adhesive to add my burlap. 
Once that was dry, I hot glued some metal clips to the front.  Then I added some chalkboard tags.  Feeling Frenchy, I wrote numbers 1-6 in French onto each tag.
As a finishing touch, I used a grungy red safety pin to add the Eiffel Tower image.  I have it propped on a music stand in the tea room.  Total cost: $1!

Linking to The Shabby Nest: Frugal Friday.

Jeanine
Share
Tweet
Pin
Share
8 comments
I came across a stash of small dollar store matchboxes I bought over the holidays. I love when I find something I completely forgot about.  It's like getting something new without having to spend any money.  I've really been admiring the matchboxes that Petite Michelle Louise and A Little Bit French make.  Thank you ladies for the inspiration for these:
All of the images are from the Graphics Fairy (thank you, Karen!).  I simply printed them out, sized them and glued them onto each matchbox.
I added some vintage lace and trim to the two religious ones.  For each of them, I added some vintage French poetry book paper which I distressed a bit.  Others simply got some rhinestone or faux pearl embellishments.  Or a flower.
Let me tell you, they are addicting!  I can't wait to make some more.  I have them displayed in an upcycled thrift store wood tray between my kitchen and dining room and they just look so pretty there!

Linking to The Graphics Fairy: Brag Monday and Between Naps on the Porch: Met Monday.

Jeanine
Share
Tweet
Pin
Share
9 comments
I've had these tall wooden spools for a few years now.  I purchased them from Home Goods and they originally had a country motif.  I was in the mood for a change so I stripped them down and gave them a quickie French makeover:
I printed my images onto Avery label paper.  After cutting them to size, I simply stuck each image on and added rhinestones to each crown.  For one of them, I added some wire to make a small picture holder.
The Avery paper gives them both a nice frosted and aged look, I think.  Although I think I still have some air gaps to flatten out.
Also, if you subscribe to Woman's World magazine, maybe you saw the coupon for my Etsy shop! 
I am the second coupon/photo.  Twenty percent off using code: WWMAG12.  It's valid for 30 days.  =)

Jeanine
Share
Tweet
Pin
Share
4 comments
I have a serious bone to pick with Mother Nature today.  After a gorgeous weekend, we're back to, yup you guessed it, RAIN.  :{  For me that means, painfully dark photos and no painting whatsoever.  Boo!  Thankfully, I did manage to get this quick project done before the skies opened:
I bought this clam tote at the thrift store last week.  I gave it a few coats of white paint.  And I do mean a few...I ran out of spray paint.  Doh!
Once the paint was dry, I printed out my French image onto craft paper.  I've seen some other bloggers who tea-stain for an antique look but me being the impatient type I am, I just glued it on and gave it a coat of clear spray.
I was originally going to stencil the front and back but I couldn't think of anything clever to write so I stenciled some numbers on each side.
I used a plain ol' magic marker.  Whoops, forgot to sand some of the bubbling stuff off on the top.  Whoops!
Still, loving how it came out.  And the lavender smells divine!

Linking to Coastal Charm: Nifty Thrifty Tuesday and Faded Charm: White Wednesday.

Jeanine
Share
Tweet
Pin
Share
5 comments
Here is the first of the weekend projects that I was able to accomplish.  I bought this little wood shadowbox from the Unique Thrift Stores last week.  It was just a plain pine box.  I decided to give it a French-y makeover:
I gave it a couple of coats of white paint.  While that was drying, I used some French script scrapbook paper for my background.  Then I popped over to The Graphics Fairy and printed out some random French images.  The Eiffel Tower is actually from a necklace I got at Forever 21 a couple of years ago.  My boys love that I used Scrabble pieces to spell out Paris.
There is another small charm on the lower right corner - not sure if you can see it.  It has a cameo look to it.  The finishing touches were Marie Antoinette and the hand-stamped little French crown at the top.

I love the touch of French whimsy it adds to my livingroom!

Linking to Faded Charm: White Wednesday.

Jeanine
Share
Tweet
Pin
Share
5 comments
The boys are off from school this week so I haven't had much time to blog, much less craft.  I managed to steal a little time earlier today to make these cute, mini sheet music envelopes:
I found a great template here.  I just printed off the size I wanted (4x6) onto cardstock.  Then I traced the pattern onto my sheet music and cut each one out.  Glue along where a store-bought envelope would be sealed.
I couldn't resist adding some French stamps.
And some bees.  I even added a little pink button and a small French thank you card inside.

Super easy and I can already feel like these are going to be addictive!

Linking to: The Shabby Creek Cottage: Transformation Thursday.

Jeanine
Share
Tweet
Pin
Share
10 comments
Remember that Home Goods wood tote I posted about last week (here)?  Here it is now:
I originally wanted to paint it white but I ran out half way through.  Plan B: pink.  I wanted to make it really girly and yes, it is in our bathroom - right on top of the loo (so much nicer than saying toilet).  The starfish hand towels are from Pottery Barn.

 
I added some vintage lace on both sides.  Then I printed off the French image from The Graphic's Fairy and added them to both sides using Mod Podge.
I added this great Marie Antoinette image to both of the skinnier sides using Mod Podge.  Once that was dry, I added the rhinestone embellishments.
Then I added some Frenchy touches inside.
This tag is actually a thank you from an Etsy purchase.  I added the French script button because I accidentally ripped the tag when I added the tea-stained seam binding.  Oops!

I'm really loving it and it's exactly the girly piece that I imagined it could be!  Linking to The Graphics Fairy: Brag Monday and Between Naps on the Porch: Met Monday.

Jeanine
Share
Tweet
Pin
Share
8 comments
I've been a bit under the weather this week.  It's been a germ-fest over here and I have not been immune.  Still, I worked up some energy last night to give a French-y makeover to this metal bottle holder I got from The Christmas Tree Shoppes last year.
I bought the great Paris postmark from Etsy (graphique.etsy.com).  I simply printed it out on regular white paper and distressed the edges.  I mod podged an image to each side, giving them both a coat on top to seal the image.
Then I added some random rhinestones.  And done!  I was hoping to add some mason jars inside, but much to my dismay, they did not fit.  Instead I added some French script candles and I think they look perfect.  I'm trying to figure out what to add to the other slots but for now, I'm enjoying this quick makeover.

Linking to Between Naps on the Porch: Met Monday.

Jeanine
Share
Tweet
Pin
Share
12 comments
I was in a bit of sewing mood last night so I decided to make this shabby French pillow:
I just love this vintage-inspired fabric.  And who can resist this great image from The Graphics Fairy?
Only problem is, it doesn't match anything in the house.  Doh!  The livingroom is navy blues.  My bedroom comforters don't quite match.  Oh well, I'll either be adding her to the tea room when the weather gets warmer or on our porch swing for Spring.

Problem solved!

Linking to Funky Junk Interiors: SNS.

Jeanine
Share
Tweet
Pin
Share
2 comments
This trio of Dollar Store prayer candles has been sitting on the shelf in my craft room since December.  I finally got around to giving them a French makeover today:
Two of these great images are from The Graphics Fairy.  The third is one I purchased off of Etsy.
Once I cut out each image, I distressed the edges of each one ever so slightly.  Then I used Mod Podge to glue them on and added a coat over the image to seal it.
After all were good and dry, I started adding some of my rhinestone embellishments.  Then I broke out some tea-stained seam binding and tied on the number plaque, key and lock to each one.
I love the black and white images with just the small pops of color.  But what I love even more is that I already had everything on hand!

Linking to The Shabby Creek Cottage: Transformation Thursday.

Jeanine
Share
Tweet
Pin
Share
10 comments
Older Posts

About Me

My photo
Okio B Designs
I am a small business owner by day, and mom of two boys and DIY crafter by night. You might remember me from my old blog: One Cheap B*tch. I love sharing my tips and tricks to create affordable home decor, fashion, food, crafts and more! Drop me a line at spam-proof: jeanineb4etsy(at)yahoo(dotcom). Thanks for stopping by! Jeanine
View my complete profile

Shop the Post

Follow Me on LikeToKnow.It

liketoknow.it/OkioBDesigns

Follow Me on Pinterest!

Follow Me on Pinterest

Follow Me on Instagram!

Instagram

Follow Me on Twitter

Tweet

PR/Advertising

OkioBDesigns is a PR-friendly blog. If you have a product or service, you'd like to submit for review, please email me at jeanineb4etsy(at)yahoo(dotcom).


Please use the email address above for advertising rates and information.


My tool caddy in Romantic Homes

My tool caddy in Romantic Homes

Good Housekeeping August 2011

Good Housekeeping August 2011

Search This Blog

Blog Archive

  • ▼  2025 (3)
    • ▼  February (2)
      • ~happy monday~
      • ~antiqued dollar tree frames~
    • ►  January (1)
  • ►  2024 (7)
    • ►  July (1)
    • ►  June (2)
    • ►  May (2)
    • ►  April (1)
    • ►  January (1)
  • ►  2023 (21)
    • ►  December (5)
    • ►  November (2)
    • ►  September (1)
    • ►  August (1)
    • ►  July (3)
    • ►  June (1)
    • ►  May (4)
    • ►  April (3)
    • ►  January (1)
  • ►  2022 (23)
    • ►  December (3)
    • ►  November (4)
    • ►  September (2)
    • ►  August (1)
    • ►  July (2)
    • ►  June (4)
    • ►  April (1)
    • ►  February (3)
    • ►  January (3)
  • ►  2021 (49)
    • ►  December (7)
    • ►  November (3)
    • ►  October (3)
    • ►  September (4)
    • ►  August (3)
    • ►  July (4)
    • ►  June (3)
    • ►  May (4)
    • ►  April (8)
    • ►  March (4)
    • ►  February (2)
    • ►  January (4)
  • ►  2020 (37)
    • ►  December (10)
    • ►  November (11)
    • ►  October (5)
    • ►  September (2)
    • ►  August (1)
    • ►  July (2)
    • ►  April (3)
    • ►  February (2)
    • ►  January (1)
  • ►  2019 (40)
    • ►  December (1)
    • ►  November (4)
    • ►  October (5)
    • ►  September (4)
    • ►  August (1)
    • ►  July (2)
    • ►  June (5)
    • ►  May (3)
    • ►  April (5)
    • ►  March (2)
    • ►  February (3)
    • ►  January (5)
  • ►  2018 (43)
    • ►  December (4)
    • ►  November (5)
    • ►  October (7)
    • ►  September (4)
    • ►  August (1)
    • ►  July (1)
    • ►  June (6)
    • ►  May (2)
    • ►  April (3)
    • ►  March (1)
    • ►  February (4)
    • ►  January (5)
  • ►  2017 (44)
    • ►  December (5)
    • ►  November (5)
    • ►  October (3)
    • ►  September (3)
    • ►  August (2)
    • ►  July (4)
    • ►  June (4)
    • ►  May (3)
    • ►  April (3)
    • ►  March (3)
    • ►  February (5)
    • ►  January (4)
  • ►  2016 (58)
    • ►  December (5)
    • ►  November (5)
    • ►  October (7)
    • ►  September (7)
    • ►  August (4)
    • ►  July (4)
    • ►  June (2)
    • ►  May (2)
    • ►  April (6)
    • ►  March (3)
    • ►  February (6)
    • ►  January (7)
  • ►  2015 (89)
    • ►  December (4)
    • ►  November (7)
    • ►  October (6)
    • ►  September (8)
    • ►  August (7)
    • ►  July (8)
    • ►  June (8)
    • ►  May (6)
    • ►  April (7)
    • ►  March (9)
    • ►  February (9)
    • ►  January (10)
  • ►  2014 (152)
    • ►  December (10)
    • ►  November (11)
    • ►  October (13)
    • ►  September (11)
    • ►  August (8)
    • ►  July (16)
    • ►  June (17)
    • ►  May (12)
    • ►  April (13)
    • ►  March (13)
    • ►  February (14)
    • ►  January (14)
  • ►  2013 (199)
    • ►  December (15)
    • ►  November (15)
    • ►  October (15)
    • ►  September (15)
    • ►  August (15)
    • ►  July (17)
    • ►  June (19)
    • ►  May (18)
    • ►  April (18)
    • ►  March (18)
    • ►  February (19)
    • ►  January (15)
  • ►  2012 (186)
    • ►  December (19)
    • ►  November (14)
    • ►  October (18)
    • ►  September (16)
    • ►  August (10)
    • ►  July (14)
    • ►  June (17)
    • ►  May (15)
    • ►  April (14)
    • ►  March (15)
    • ►  February (17)
    • ►  January (17)
  • ►  2011 (118)
    • ►  December (17)
    • ►  November (19)
    • ►  October (12)
    • ►  September (9)
    • ►  August (8)
    • ►  July (17)
    • ►  June (25)
    • ►  May (11)

Created with by ThemeXpose